Blog with Nikola, Jupyter, Matlab, and GitHub pages
Table of Contents
- 1 Introduction
- 2 Pre-requisites
- 3 Configure VSCode
- 4 Create a new environment with Anaconda or Conda
- 5 Install Jupyter Notebook, Nikola and jmatlab
- 6 Create a Nikola demo site
- 7 Nikola directories
- 8 Configure a non-blog Nikola site
-
9 Extra configurations
- 9.1 Output
filesfolder location - 9.2 Avoid deploying draft posts
- 9.3 Enable single Archive
- 9.4 Favicon
- 9.5 License
- 9.6 Header
- 9.7 Footer
- 9.8 Google search form (button)
- 9.9 Index your site using Google Search Console
- 9.10 Google Analytics
- 9.11 Disqus
- 9.12 Config the sticky menu
- 9.13 Code highlighting
- 9.14 Adding Prism
- 9.1 Output
- 10 LaTex with Mathjax
- 11 Compile your website/blog and deploy on GitHub pages
- 12 Testing Python and Matlab kernel on Jupyter Notebook
- 13 Python test
- 14 Matlab test
- 15 LaTex testing
- 16 Code Highlighting test
-
17 Embedded
.pdf - 18 Incorrect cell code highlighting with two kernels
Introduction
Nikola is a good way to build a static website/blog. It's versatile, powerful and open-source. There are other options such as Hugo, Pelican, and Sphinx. After reviewing their pros and cons, I decided to use Nikola mainly because of its Jupyter and Matlab-kernel integration.
There is a lot of good material on the internet about installing and using Nikola, but I thought it will be useful to show my methodology from the perspective of someone who has never used Anaconda, Jupyter and Nikola.
Nevertheless, here is a list of the official documentation and good tutorials I recommend:
Pre-requisites
- Anaconda.
- Jupyter Notebook.
- Matlab-kernel (jmatlab).
- VSCode, but you can use any editor you like.
- GitHub pages.
- Knowledge in HTML, CSS, JS, Matlab, Python, Git, Markdown, and reStructedText.
Configure VSCode
- Install the Python extension.
- Make sure
Python › Data Science: Allow Import From Notebooksetting is enabled.
Create a new environment with Anaconda or Conda
- Download and install Anaconda or Miniconda. It's your choice.
- After the installation is complete, make sure the following are listed in you Windows
system path variables:C:\Users\<user_name>\anaconda3\ C:\Users\<user_name>\anaconda3\condabin C:\Users\<user_name>\anaconda3\Library C:\Users\<user_name>\anaconda3\Scripts - To check where is installed anaconda, run the following:
where conda - In Anaconda Navigator, create a new environment named
jmatlabNikolawithPython 3.8. - Or open terminal (recommended) and run
conda create --name jmatlabNikola python=3.8 - A new folder will be created inside
C:\Users\<user_name>\.conda\envs\
Why Python 3.8?
Matlab engine is compatible with Python 2.7 and 3.x. Version 3.7 is for Matlab 2019+, 3.6 is for Matlab 2018+, and 3.8 is for 2022a.
Why a new environment?
Anaconda (conda) is a powerful package management platform that allows you to install any self-contained workspace (environment) with different kernels and libraries. For example, let's say I have two environments:
-
jmatlabNikola: composed by Python 3.8, Jupyter Notebook, jmatlab, and Nikola. -
openCV_TF: composed by Python 3.7, OpenCV, and TensorFlow.
So, let's say I want to write a post, I should do the following:
-
Run
activate jmatlabNikola→ it switches to Python 3.8 (you can check withpython --version).(jmatlabNikola) C:\Users\<user_name>\blog>python --version Python 3.8.13 :: Anaconda, Inc.Any post I write will be compiled by this environment only. None of the libraries from the other environment(s) will be available.
But if I want to work with OpenCV:
- Run
activate openCV_TF→ it switches to Python 3.7. The kernel and libraries ofjmatlabNikolaare not available and won't get mixed with this environment.(openCV_TF) C:\Users\<user_name>\ML_project>python --version Python 3.7.6 :: Anaconda, Inc.
Notes
- Don't use the
baseenvironment of Anaconda if you want to test packages. Use it as a reference because it's the default environment for your OS. - If you already have Python installed, you can still use Anaconda without any problems. Just make sure the
Anaconda python pathis configured in VSCode. - Your work files and folders could be anywhere on your hard drive, but don't create them inside the environment folders.
Install Jupyter Notebook, Nikola and jmatlab
-
Open terminal in
cd "C:\Users\<user_name>\.conda\envs\jmatlabNikola" -
Install Jupyter Notebook and nbextensions:
- Install Jupyter.
pip install notebook - Install the
nbextensions.pip install jupyter_contrib_nbextensions jupyter contrib nbextension install --user - Install the Jupyter nbextension configurator
pip install jupyter_nbextensions_configurator jupyter nbextensions_configurator enable --user - Run Jupyter Notebook by command line to check it was installed correctly with the nbextensions.
jupyter notebook - It will open the browser in http://localhost:8888 where I recommend to enable the following nbextensions:
- (some) LaTex environments for Jupyter
- Equation Auto Numbering
- CodeMirror mode extensions -> Matlab/Octave highlighting
- Table of Contents (2) -> auto ToC
- Install Jupyter.
-
Install Nikola.
pip install Nikola[extras] -
Install Matlab-kernel.
pip install matlab_kernel python -m matlab_kernel install --user -
Check installed kernels.
jupyter kernelspec listYou'll see something like this.
Available kernels:
matlab     C:\Users\<user_name>\AppData\Roaming\jupyter\kernels\matlab
matlab     C:\Users\<user_name>\.conda\envs\jmatlabNikola\share\jupyter\kernels\matlab_connect
python3    C:\Users\<user_name>\.conda\envs\jmatlabNikola\share\jupyter\kernels\python3
** Config Matlab **
- Open terminal as administrator
activate jmatlabNikola - Go to
cd "C:\Program Files\MATLAB\R2022a\extern\engines\python" - Install the Python engine.
python setup.py install
Done!, now you have everything what it's needed in your environment.
Notes
- Make sure you activate
jmatlabNikolaenvironment with admin rights to installmatlab_kernel. - If you have doubts about the Python kernel, check with
python --versionevery time you activate an environment.
Create a Nikola demo site
- Create a new folder called
bloganywhere you like except inside thejmatlabNikolaenvironment. - Open terminal inside your
blogfolder. - Activate the environment.
activate jmatlabNikola - Initialize a demo, and fill its content.
nikola init --demo - Build (generate) the HTML files of the site.
nikola build - View on your browser. It will open the localhost on
http://127.0.0.1:8000.nikola serve -b - Automatically
buildandserveyour site if you want to see all changes constantly (recommended).nikola auto - Clean
output/content whenever you remove any of content manually from yourblogfolder. Use it beforebuildcommand.nikola check -f --clean-files - Press
ctrl+cto stop the server.
Note
At this point you can deploy on Github Pages. Just go to the section Compile your website/blog and deploy on GitHub pages and follow the instructions.
Create a new post and new page
- Create a new post and new page. By default, they are created in
.rstformat.nikola new_post nikola new_page - Other posts on different formats. For
-f ipynb, it is needed extra configuration, you'll see that later.nikola new_post -f markdown nikola new_post -f rest nikola new_post -f html nikola new_post -f ipynb
Create a clean Nikola site
Same as before but run nikola init instead of nikola init --demo.
That's it!. Navigate through the files and see what Nikola has done with the demo or the clean version.
Nikola directories
Although, most of them are self-explained, they can be categorized in three types:
- Content:
files,galleries,images,listings,pages,posts. - Customization:
plugins,templates,themes. - Visible output:
output. Here, all your content is parsed to.htmlto be visible in any web hosting service such as GitHub pages.../__pycache__ ../cache ../files # all the files of your blog, e.g. pdf, videos, etc. ../galleries # galleries of images. ../images # images of your website. ../listings # code files, e.g. .py, .tex, .m, .cpp, etc. ../output # the root directory of your website. ../pages # stores index.html, blog.html, home.html, about-me.html. ../plugins # additional plugins. ../posts # stores all your posts, .md, .html, .ipynb, and .rst ../templates # additional templates. ../themes # additional themes.
Configure a non-blog Nikola site
From now on, we will configure Nikola using conf.py, located in your root directory.
Create the index page and bio page
- First, create both pages using the terminal.
nikola new_page --title="index"
nikola new_page --title="bio"
- Add them to the navigation links.
NAVIGATION_LINKS = {
    DEFAULT_LANG: (
        ("/index.html", "Home"),
        ("/bio/index.html", "Bio"),
        ...
    ),
- Add any other page, just make sure to add them on the navigation list, e.g. about-me, contact, etc.
Use Jupyter Notebooks
- By default, Nikola uses the blog configuration.
POSTS = (
    ("posts/*.rst", "posts", "post.tmpl"),
    ("posts/*.md", "posts", "post.tmpl"),
    ("posts/*.txt", "posts", "post.tmpl"),
    ("posts/*.html", "posts", "post.tmpl"),
    ("posts/*.ipynb", "posts", "post.tmpl"),
)
PAGES = (
    ("pages/*.rst", "pages", "page.tmpl"),
    ("pages/*.md", "pages", "page.tmpl"),
    ("pages/*.txt", "pages", "page.tmpl"),
    ("pages/*.html", "pages", "page.tmpl"),
    ("pages/*.ipynb", "pages", "page.tmpl"),
)
- Change it to the non-blog configuration.
POSTS = (
    ("posts/*.rst", "blog", "post.tmpl"),
    ("posts/*.md", "blog", "post.tmpl"),
    ("posts/*.txt", "blog", "post.tmpl"),
    ("posts/*.html", "blog", "post.tmpl"),
    ("posts/*.ipynb", "blog", "post_ipynb.tmpl"),
)
PAGES = (
    ("pages/*.rst", "", "page.tmpl"),
    ("pages/*.md", "", "page.tmpl"),
    ("pages/*.txt", "", "page.tmpl"),
    ("pages/*.html", "", "page.tmpl"),
    ("pages/*.ipynb", "", "post_ipynb.tmpl"),
)
# And to avoid a conflict because blogs try to generate /index.html
INDEX_PATH = "blog"
- Check if
.ipynbis listed in the compilers section.COMPILERS = { "rest": ['.rst', '.txt'], "markdown": ['.md', '.mdown', '.markdown'], "textile": ['.textile'], "txt2tags": ['.t2t'], "bbcode": ['.bb'], "wiki": ['.wiki'], "ipynb": ['.ipynb'], "html": ['.html', '.htm'], ...
- If you
buildandservethe site, it will give you an error of"missing post_ipynb.tmpl". We'll create it on the next section. - Change
post_ipynb.tmpltopost.tmpl, and runnikola autoto see the default Jupyter Notebook style.
Create the post_ipynb.tmpl template
- Create a new theme.
nikola theme --new=themeBlog --parent=bootstrap4 --engine=mako - Copy
post.tmpltemplate from the parent theme.nikola theme --copy-template=post.tmpl - Move it to the
/themes/themeBlog/templates/post_ipynb.tmplfolder and rename it aspost_ipynb.tmpl - Add the following on the extra head section.
<%block name="extra_head">
    ...
    <link rel="stylesheet" href="../../assets/css/post_ipynb.css">
</%block>
Create the post_ipynb.css
Create the file inside /themes/themeBlog/assets/css/post_ipynb.css folder and copy the following.
div.prompt {
    padding: 0.6em;
    font-size: 13px;
    background-color: #ffffff;
    margin-right: 0em;
    -webkit-border-radius: 3px;
    -moz-border-radius: 3px;
    border-radius: 3px;
}

div.output_prompt {
    /* 5px right shift to account for margin in parent container */
    margin: 0 5px 0 0px;
}

  div.output_area pre {
    font-size: 13px;
}

div.text_cell_render {
    padding: 0px;
    color: #333333;
}

.rendered_html p {
    text-align: left;
}

.rendered_html ul {
    margin: 0 0 12px 25px;
}

.rendered_html :visited {
    text-decoration: none;
}

.rendered_html :link {
    text-decoration: none;
  }

.rendered_html pre, .rendered_html code {
    background-color: #eeeeee;
    margin: 1em 0em;
    font-size: 14px;
}

.rendered_html pre {
    padding-left: 0.5em;
    padding-right: 0.5em;
    padding-top: 0.05em;
    padding-bottom: 0.05em;
}

.page-content > .content p {
    margin: 0 0 0px;
}


div.input  {
    border: none;
    background-color: none;
}

/* set a max-width for horizontal fluid layout and make it centered */
.body-content {
    margin-right: auto;
    margin-left: auto;
    max-width: 100%; /* or 950px */
}

/* Widens image-containing divs so that image is full body width */
div.output_subarea {
    max-width: 100%;
}
Change it at pleasure. In my case, among other minor changes, I set the background-color: #ffffff to get rid off the left gray ribbon on each cell.
Clean version of post_ipynb.css
div.prompt {
    display: none;
}

div.input  {
    border: none;
    background-color: none;
}

div.input * {
    background-color: none;
}

/* set a max-width for horizontal fluid layout and make it centered */
.body-content {
  margin-right: auto;
  margin-left: auto;
  max-width: 100%; /* or 950px */
}

/* Widens image-containing divs so that image is full body width */
div.output_subarea {
    max-width: 100%;
}
Use your custom theme
Once you are happy with the changes.
- Enable your theme.
THEME = "themeBlog"
- Create a Jupyter Notebook post, and start editing with VSCode.
nikola new_post -f ipynb --title="Jupyter-notebook-test"
Extra configurations
Output files folder location
Your documents saved in the files folder will be copied to /output/files instead of the root folder, which is the default location.
FILES_FOLDERS = {'files': 'files'}
Avoid deploying draft posts
If you don't want to deploy a draft post.
-
Add to the metadata post.
.. status: draft -
Set in
conf.pyDEPLOY_DRAFTS = False
It will be built and seen on your localhost but won't be deployed to GitHub. Also, when you run
nikola github_deploy, the draft post is removed from theoutputfolder.
By default the metadata has no status line or is set to:
.. status: published
License
Add a license to your content.
LICENSE = """
<a rel="license" href="https://creativecommons.org/licenses/by-nc-sa/4.0/">
<img alt="Creative Commons License BY-NC-SA"
style="border-width:0; margin-bottom:12px;"
src="https://i.creativecommons.org/l/by-nc-sa/4.0/88x31.png"></a>"""
Header
Add FontAwesone and Academic Icons to use in the footer content.
EXTRA_HEAD_DATA = '''
  <link rel="stylesheet" href="https://maxcdn.bootstrapcdn.com/font-awesome/latest/css/font-awesome.min.css">
  <link rel="stylesheet" href="https://cdn.rawgit.com/jpswalsh/academicons/master/css/academicons.min.css">
'''
Footer
Customize the footer as you like. A good way is to show your social network profiles.
CONTENT_FOOTER = '''
<div class="text-center">
<p>
<span class="fa-stack fa-2x">
<a href="https://github.com/<user_name>">
<i class="fa fa-github-square fa-stack-2x"></i>
</a>
</span>
<span class="fa-stack fa-2x">
<a href="https://scholar.google.com/citations?user=ID">
<i class="ai ai-google-scholar-square ai-2x"></i>
</a>
</span>
<span class="fa-stack fa-2x">
<a href="https://www.linkedin.com/in/ID">
<i class="fa fa-square fa-stack-2x"></i>
<i class="fa fa-linkedin fa-inverse fa-stack-1x"></i>
</a>
</span>
<span class="fa-stack fa-2x">
<a href="mailto:{email}">
<i class="fa fa-square fa-stack-2x"></i>
<i class="fa fa-envelope fa-inverse fa-stack-1x"></i>
</a>
</span>
</p>
<p>
{license} Contents © {date} <a href="mailto:{email}">{author}</a> - Powered by <a href="https://getnikola.com" rel="nofollow">Nikola</a>
</p>
</div>
'''
Google search form (button)
Add the following
SEARCH_FORM = """
<!-- Google custom search -->
<form method="get" action="https://www.google.com/search" class="navbar-form navbar-right" role="search">
    <div class="input-group">
        <input type="text" name="q" class="form-control" placeholder="Search">
        <button type="submit" class="btn btn-secondary">
            <i class="fa fa-search"></i>
        </button>
        <input type="hidden" name="sitesearch" value="%s">
    </div>
</form>
<!-- End of custom search -->
""" % SITE_URL
Notes
- You may find that
conf.pyuses Glyphicon, but recently Bootstrap 4+ changed it to FontAwesome, so Glyphicon is not available anymore. - Change
form-grouptoinput-group. - More configurations with Bootstrap 4 demo Icon inputs.
-
Duckduckgo is also available in the
conf.pyfile.
Index your site using Google Search Console
To make sure your site can be find through Google, index it with Google Search Console. You can also do it using your Google Analytics account if you have one, but the easiest way is using HTML meta tag, official documentation.
- Go to Google Search Console website.
- Select
URL prefixas property type, and introduce your urlhttps://<github_username>.github.io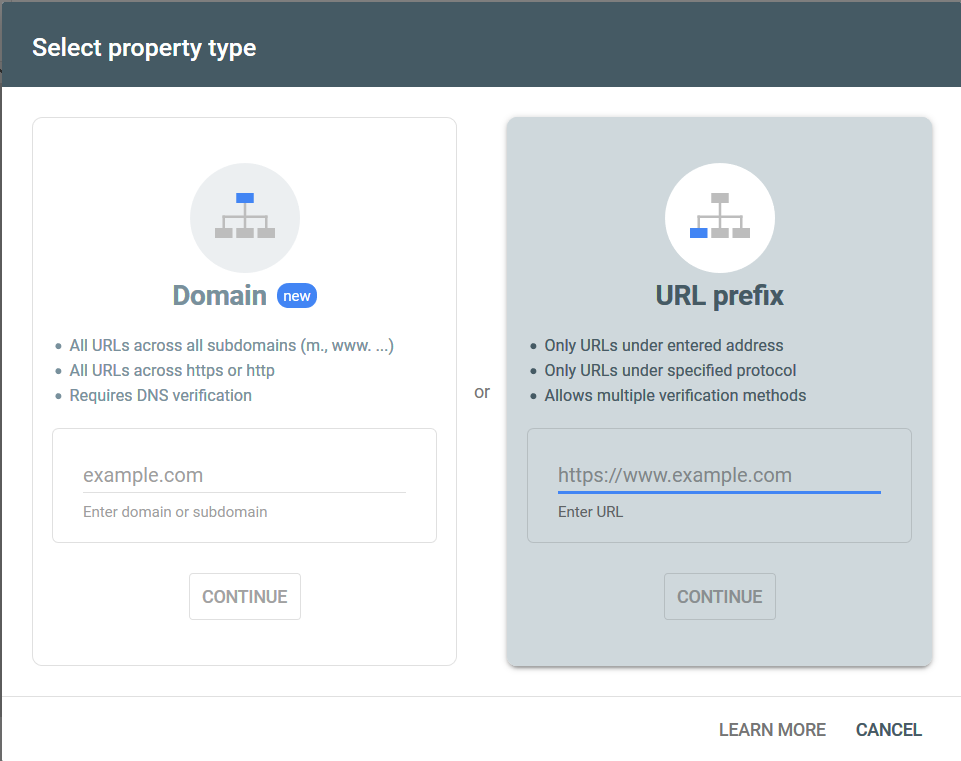
- On the Verify ownership window, select HTML tag
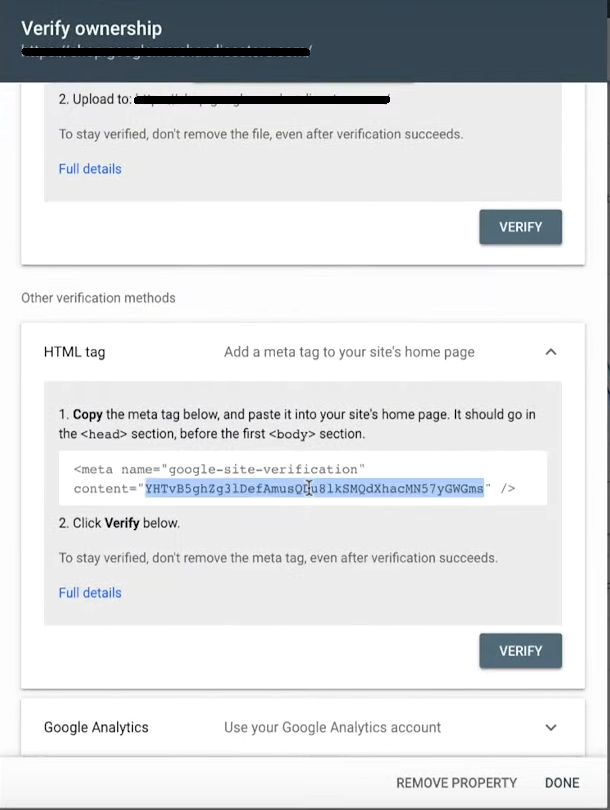
- Copy the unique given code to
EXTRA_HEAD_DATA = '''
  ...
  <meta name="google-site-verification" content="FvPotVuMyeh_tpN7AvA8uZBWgDSyNfoHe6HrnEFiKTE" />
'''
- Build and deploy your site.
- Select
Verify, and you will see
- Finally, add your
sitemap.xmlby going to Google Search Console menu/Sitemaps, and Submithttps://<github_username>.github.io/sitemap.xml. You can verify this file is generated automatically with Nikola, and is located inside the output folder.
Google Analytics
In order to use the new version 4, follow the steps.
- Go to Google Analytics and create an account.
- Go to Admin an create a new Property, prefarable with the name of you site.
- Select your industry category and business size.
- Select the Property and add a new Data Stream.
- Select Web and put the url of your site.
- Once created, select the Web stream details and copy the MEASUREMENT ID or the Global Site Tag (gtag.js) script.
- Go to
conf.pyand add the following.
BODY_END = '''
  ...

  <!-- Global site tag (gtag.js) - Google Analytics -->
  <script async src="https://www.googletagmanager.com/gtag/js?id=GA_MEASUREMENT_ID"></script>
  <script>
    window.dataLayer = window.dataLayer || [];
    function gtag(){dataLayer.push(arguments);}
    gtag('js', new Date());
    gtag('config', 'GA_MEASUREMENT_ID);
  </script>
'''
Disqus
- Create an account on Disqus.
- Create a new site.
- Choose a
disqus_shortname, e.g.github_user_name. I recommend not to use<user_name>.github.io - Add your blog site
<user_name>.github.io. - Choose 'Basic Plan'
- Skip instructions on the 'Select Platform' section.
- Finally, enable the following on the Nikola
conf.pyCOMMENT_SYSTEM = "disqus" COMMENT_SYSTEM_ID = "<disqus_shortname>"
Config the sticky menu
You can set the navigation bar sticks on the top as you scroll down the page.
- Copy the parent base template.
nikola theme --copy-template=base.tmpl
- Move it to
/themes/themeBlog/templates/base.tmpland add the following.<!-- Menubar --> <nav class="navbar navbar-expand-md sticky-top mb-4 ...
Adding Prism
Alternatively, I like to use Prism due its JSONP Highlight plugin which allows you to import external code hosted on GitHub or some other place.
- Select the Minifed version and all available languages.
- Add any plugin. My selection is as follows.
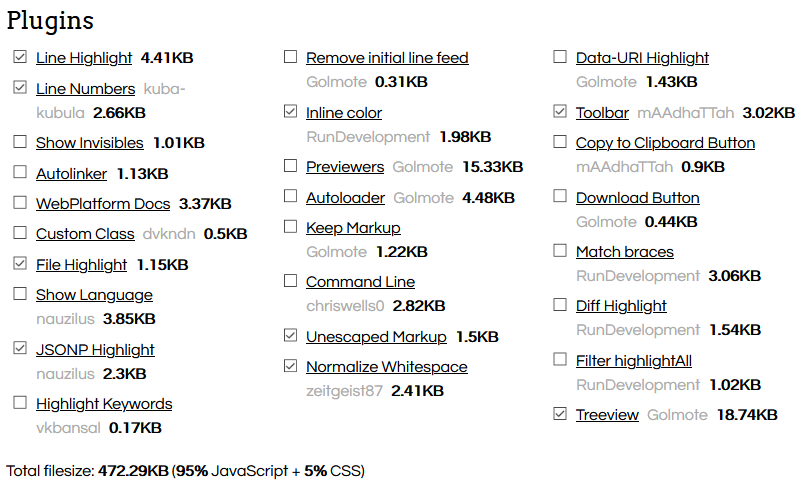
- Download the JS and CSS files.
- Save them on
/themes/themeBlog/assets/css/prism.cssand/themes/themeBlog/assets/js/prism.js - Add the following on the Nikola
conf.pyEXTRA_HEAD_DATA = ''' ... <link href="../../assets/css/prism.css" rel="stylesheet" /> ''' BODY_END = ''' <script src="../../assets/js/prism.js"></script> '''
- Also, add the
prism.cssinto thepost_ipynb.tmpl<%block name="extra_head"> ... <link href="../../assets/css/prism.css" rel="stylesheet" /> </%block>
- Done!.
- Now, use the following code in Markdown and Jupyter Notebook in order to import and highlight an external code file.
<pre class="lang-markup" data-jsonp="https://api.github.com/repos/<user_name>/<repository_name>/contents/<file_name>"></pre>
- In rST.
.. raw:: html

  <pre class="lang-markup" data-jsonp="https://api.github.com/repos/<user_name>/<repository_name>/contents/<file_name>"></pre>
- Check Prism Plugins for usage examples.
LaTex with Mathjax
By default Nikola uses MathJax, and with the Jupyter nbextensions, environments such as \begin{align}...\end{align} and others LaTex environments can be used. But, if you want support for the $...$ inline or $$...$$ paragraph syntax LaTex, uncomment the following on Nikola conf.py. Also, you can add Tex commands for the auto numbering equations. More options at MathJax docs.
MATHJAX_CONFIG = """
<script type="text/x-mathjax-config">
MathJax.Hub.Config({
    tex2jax: { // https://docs.mathjax.org/en/v2.7-latest/options/preprocessors/tex2jax.html
        inlineMath: [ ['$','$'], ["\\\(","\\\)"] ],
        displayMath: [ ['$$','$$'], ["\\\[","\\\]"] ],
        processEscapes: true
    },
    displayAlign: 'center', // Change this to 'left' if you want left-aligned equations.
    "HTML-CSS": {
        styles: {'.MathJax_Display': {"margin": 0}}
    },
    TeX: { // https://docs.mathjax.org/en/v2.7-latest/options/input-processors/TeX.html
        equationNumbers: {
            autoNumber: "AMS" // AMS, all, none
        }
    }
});
</script>
"""
Compile your website/blog and deploy on GitHub pages
-
Build the project site
nikola build -
If everthing was built correctly then check the results with
nikola serve --browserotherwise see Notes for possible error solutions.
-
Install Git and make the following are added to your
system path variablesC:\Program Files\Git C:\Program Files\Git\cmdyou can check the location with
where gitcommand. -
Create a new repository named
<user_name>.github.ioon your GitHub account. -
Initialize Git and add origin inside the
blogfolder of your local drive.git init . git remote add origin https://github.com/<user_name>/<user_name>.github.io -
Create a
.gitignore.vscode .doit.db* cache __pycache__ output .ipynb_checkpoints */.ipynb_checkpoints/* -
Edit Nikola
conf.pyGITHUB_SOURCE_BRANCH = 'src' GITHUB_DEPLOY_BRANCH = 'master' GITHUB_REMOTE_NAME = 'origin' GITHUB_COMMIT_SOURCE = True
-
Deploy to GitHub.
nikola github_deploy -
Select the
masterbranch on the GitHub Pages section located on the repository settings. -
Open
https://<user_name>.github.ioto see the results.
Notes
-
Nikola creates two branches,
masterhas the content of the output folder, andsrchas the actual content of your posts and pages. -
If the following errors appear:
ERROR: yapsy: Unable to import plugin: C:\Users\<user_name>\.conda\envs\Nikola\lib\site-packages\nikola\plugins\compile\ipynbor
Cannot find 'ipynb' compiler; it might require an extra pluginyou must downgrade
nbconvertto5.6.1. Do the following:pip uninstall nbconvert pip install nbconvert==5.6.1 conda install "nbconvert=5.6.1"make sure to reinstall
matlab_kernelwithpip install matlab_kernel python -m matlab_kernel install --userand erase
.doit.db.bak,.doit.db.datand.doit.db.dirfrom the root folder.
Testing Python and Matlab kernel on Jupyter Notebook
For this section, we will to run VSCode under our environment.
- Open terminal inside the root folder
- Activate the environment.
activate jmatlabNikola - Open VSCode
code - Check if the kernels are available.

- If the
matlabkernel is not listed then you must install again thematlab_kernelwithpython -m matlab_kernel install --user - Alternatively, activate
jmatlabNikolaand run VSCode with Anaconda Navigator. - Remember to switch the Matlab and Python kernels for each cell.
Now that everything is set, let's do some testing with both kernels.
Notes
- If you use the native Jupyter Notebook editor on your browser you will see all the kernels.

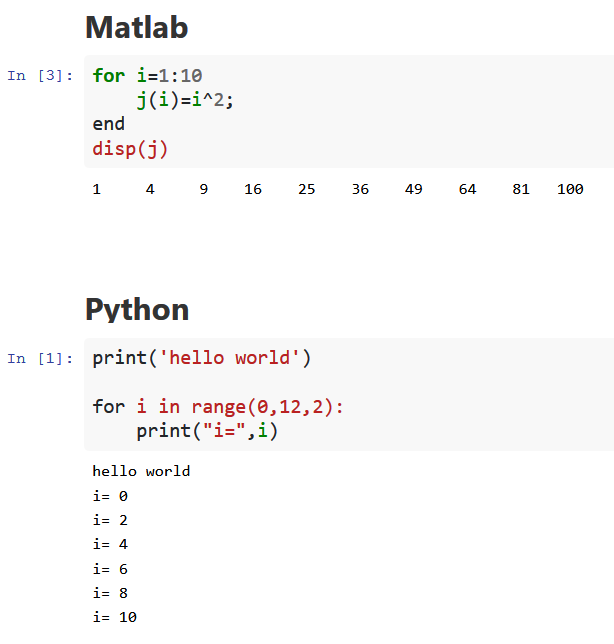
Python test
print('Hello world')

for i in range(0,12,2):
    print("i=",i)
disp("hello world")
format compact
for i=0:2:10
    i
end
Matlab functions
The Matlab-kernel does not support inline functions so you need to save them as files.
- For the Jupyter Notebook editor on your browser, use the magic command
%%file /files/<file>.m. It will save it in/blog/files - But for VSCode, use
%%file 'c:/<absolute_path>/<file>.m'
%%file 'C:/Users/zurit/OneDrive/blog/files/fnc.m'

function c = multi_line_func(a,b)
    % in-file comments can be added like this
    a = a+1;
    b = b+2;
    c = a+sin(b);
end
To make sure it uses the fnc.m, open the folder with the Matlab command cd c:/<absolute_path>/<file>.m before. Save some space using format compact.
cd 'C:/Users/zurit/OneDrive/blog/files'

format compact
for i=1:10
    c(i) = fnc(i,i+1);
end
disp(c)
plot(1:10,c)

3D plotting
Let's use %plot inline magic command.
tx = linspace (-8, 8, 41);
ty = tx;
[xx, yy] = meshgrid (tx, ty);
r = sqrt (xx .^ 2 + yy .^ 2) + eps;
tz = sin (r) ./ r;

%plot inline
mesh(tx, ty, tz);

Matlab optimization solver
We can also call the Matlab solvers.
H = [1,-1,1
    -1,2,-2
    1,-2,4];
f = [2;-3;1];
lb = zeros(3,1);
ub = ones(size(lb));
Aeq = ones(1,3);
beq = 1/2;

x = quadprog(H,f,[],[],Aeq,beq,lb,ub)
LaTex testing
Some LaTex formulas. Inline example, $ f(x) = x^{2}$ $ f(x) = x^{2}$. Remember that you can still use $$...$$.
Examples.
\begin{equation}
\begin{aligned}
\underbrace{
	\overbrace{
		\begin{bmatrix}
		Px              & 0               & \dots & 0     \\
		P_u \bar{\nu} K & 0               & \dots & 0     \\
		0               & P_x             & \dots & 0     \\
		0               & P_u \bar{\nu} K & \dots & 0     \\
		\dots           & \dots           & \dots & \dots
		\end{bmatrix}
	}^{\mathcal{M}}
	\begin{bmatrix}
	(A+B K)^0     \\
	(A+B K)^1     \\
	\vdots        \\
	(A+B K)^{n-1}
	\end{bmatrix}
}_{P_{x_N}}
\hat{x}_{k+N|k}
\leq
\underbrace{
	\begin{bmatrix}
	q_x    \\
	q_u    \\
	q_x    \\
	q_u    \\
	\vdots
	\end{bmatrix}
}_{q_{x_N}}
\end{aligned}
\end{equation}
\begin{equation} \begin{aligned} \underbrace{ \overbrace{ \begin{bmatrix} Px & 0 & \dots & 0 \\ P_u \bar{\nu} K & 0 & \dots & 0 \\ 0 & P_x & \dots & 0 \\ 0 & P_u \bar{\nu} K & \dots & 0 \\ \dots & \dots & \dots & \dots \end{bmatrix} }^{\mathcal{M}} \begin{bmatrix} (A+B K)^0 \\ (A+B K)^1 \\ \vdots \\ (A+B K)^{n-1} \end{bmatrix} }_{P_{x_N}} \hat{x}_{k+N|k} \leq \underbrace{ \begin{bmatrix} q_x \\ q_u \\ q_x \\ q_u \\ \vdots \end{bmatrix} }_{q_{x_N}} \end{aligned} \end{equation}
\begin{equation*}
\begin{cases}
\begin{aligned}
	\hat{x}_{k+1|k+1} & = \hat{x}_{k+1|k} + \gamma_{k+1} K_{k+1} \left( y_{k+1} -  C \hat{x}_{k+1|k} \right) \\
	e_{k+1|k+1}       & = \left(I-\gamma_{k+1} K_{k+1} C \right) e_{k+1|k} -\gamma_{k+1} K_{k+1} \nu_{k+1}   \\
	P_{k+1|k+1}       & = P_{k+1|k} - \gamma_{k+1} K_{k+1}C~P_{k+1|k}                                        \\
	K_{k+1}           & = P_{k+1|k} C^\intercal (C P_{k+1|k} C^\intercal+R_z)^{-1}
\end{aligned}
\end{cases}
\end{equation*}
\begin{equation*} \begin{cases} \begin{aligned} \hat{x}_{k+1|k+1} & = \hat{x}_{k+1|k} + \gamma_{k+1} K_{k+1} \left( y_{k+1} - C \hat{x}_{k+1|k} \right) \\ e_{k+1|k+1} & = \left(I-\gamma_{k+1} K_{k+1} C \right) e_{k+1|k} -\gamma_{k+1} K_{k+1} \nu_{k+1} \\ P_{k+1|k+1} & = P_{k+1|k} - \gamma_{k+1} K_{k+1}C~P_{k+1|k} \\ K_{k+1} & = P_{k+1|k} C^\intercal (C P_{k+1|k} C^\intercal+R_z)^{-1} \end{aligned} \end{cases} \end{equation*}
Code Highlighting test
-
With Pygments.
for k = 1:nk+1
    % Constrained MPC control law (RH-FH) LQ-MPC at every step k
    if mode == 'reg'
        [Ustar,fval,flag] = quadprog(H,L*x,Pc,qc+Sc*x);
    elseif mode == 'trk'
        [NUstar,fval,flag] = quadprog(H,L*epsilon(:,k),Pc_ssto,qc_ssto+Sc_ssto*epsilon(:,k));
    end
    % check feasibility
    if flag < 1
        disp(['Optimization is infeasible at k = ',num2str(k)]);
        break;
    end
end
-
With Prism.
  for k = 1:nk+1
      % Constrained MPC control law (RH-FH) LQ-MPC at every step k
      if mode == 'reg'
          [Ustar,fval,flag] = quadprog(H,L*x,Pc,qc+Sc*x);
      elseif mode == 'trk'
          [NUstar,fval,flag] = quadprog(H,L*epsilon(:,k),Pc_ssto,qc_ssto+Sc_ssto*epsilon(:,k));
      end
      % check feasibility
      if flag < 1
          disp(['Optimization is infeasible at k = ',num2str(k)]);
          break;
      end
  end
Embedded .pdf
To embed a local or external .pdf document, you can use the Google Drive viewer in html code with Markdown.
<object data="https://drive.google.com/viewerng/viewer?embedded=true&url=https://raw.githubusercontent.com/<user_name/<repository_name>/master/<file_name>.pdf" width="100%" height="1200px">
    <p>It appears you don't have a PDF plugin for this browser or JavaScript is disabled. You can <a href="https://drive.google.com/viewerng/viewer?embedded=true&url=https://raw.githubusercontent.com/<user_name/<repository_name>/master/<file_name>.pdf">download the PDF.</a></p>
</object>
Example
Incorrect cell code highlighting with two kernels
The cell code highlighting has some problems when you have double kernels in your Notebook, which is a problem of the Jupyter Notebook metadata.
Example of poor code highlighting.
My partial solution is to add the following to the .ipynb metadata (raw data) of the Notebook post.
"metadata": {
  ...
  "language_info": {
    ...
    "pygments_lexer": "octave"
    },
},
It's done only once but you have to edit the Notebook with VSCode. If you edit it with the Jupyter Notebook browser GUI, it will change the metadata content every time you switch the kernel. Try it for yourself!.
- With
"pygments_lexer": "octave".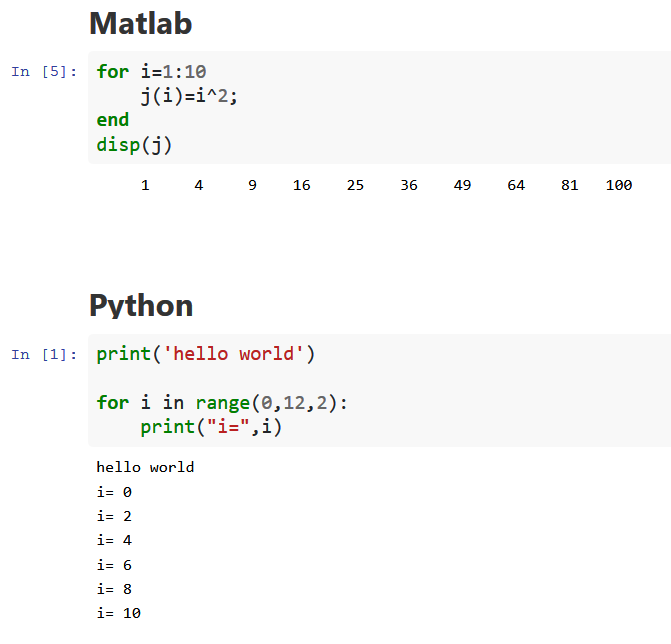
- With
"pygments_lexer": "ipython3"Pygments.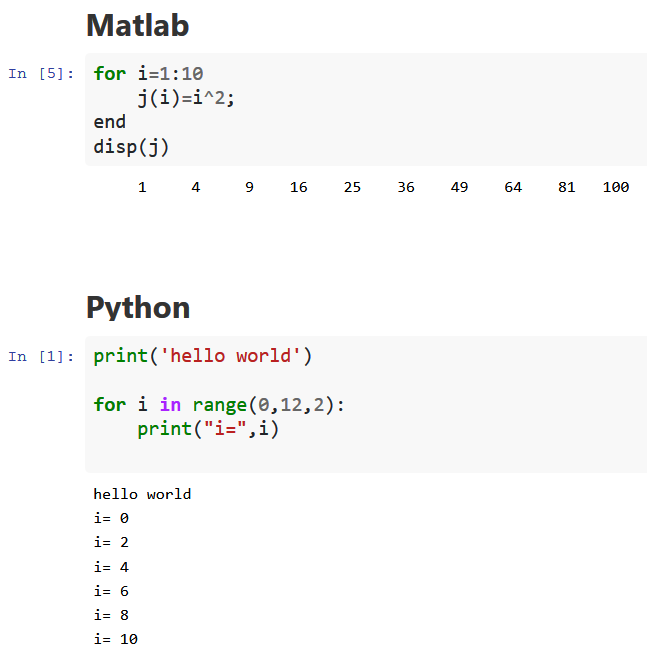
Extra
If you want to post with multiple kernels and more programming languages, it's worth trying SoS Notebook.
Well, that's it for now. Thanks for reading.
Comments
Comments powered by Disqus